Blazor WebAssembly standalone - Calling a protected API using access token
Introduction
In this post, I want to talk about calling a protected API from ASP.NET Core Blazor WASM standalone app. This is the second post of my Blazor series, if you have not read my first post for Blazor WebAssembly authentication and authorization with IdentityServer4 I suggest to start from there.
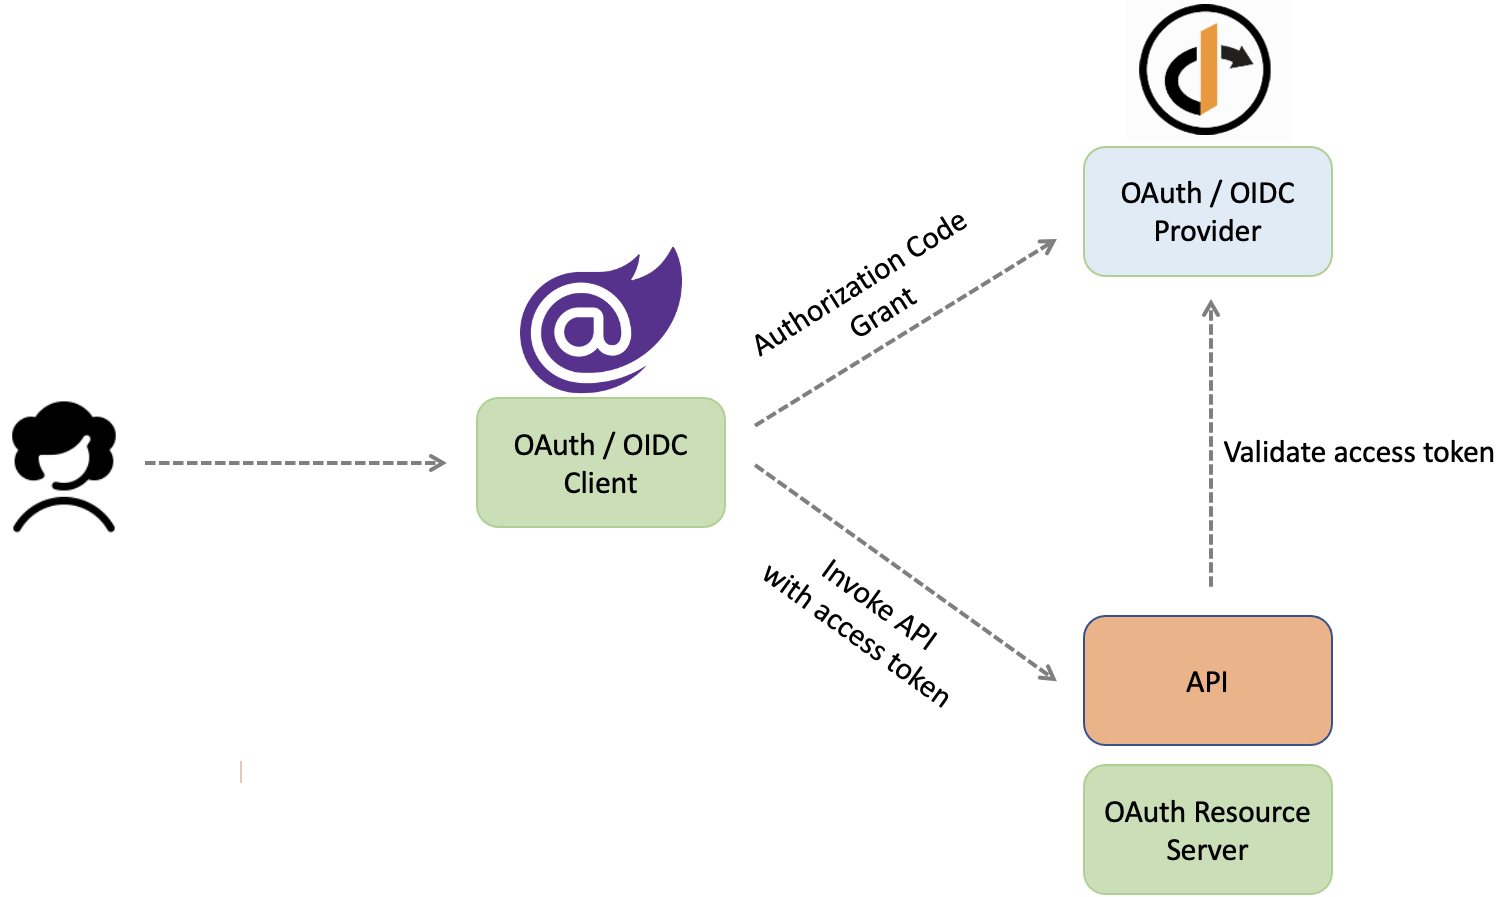
The assumption here is that you’ve already setup the IdentityServer and Blazor WebAssembly app instances. We will be going through adding a protected API endpoint and calling it from the Blazor WASM standalone app using the access_token. The solution structure will be like this:
- BlazorSecurity.sln
  - IdentityServer.csproj
  - WasmAppAuth.csproj
  - Api.csproj
  - Models.csproj
Sample code
Find the sample code for this post on Blazor Adventures repo.
Pre-requirements and versions
API
This section includes all changes required on API project to have a protected endpoint available.
Setup API project:
Start with creating a web API project follow the official docs. After creation of API project, open launchSettings.json located under Properties folder and change it to add or adjust HTTPS urls.
{
  "$schema": "http://json.schemastore.org/launchsettings.json",
  "iisSettings": {
    "windowsAuthentication": false,
    "anonymousAuthentication": true,
    "iisExpress": {
      "applicationUrl": "http://localhost:5006",
      "sslPort": 5016
    }
  },
  "profiles": {
    "IIS Express": {
      "commandName": "IISExpress",
      "launchBrowser": true,
      "launchUrl": "swagger",
      "environmentVariables": {
        "ASPNETCORE_ENVIRONMENT": "Development"
      }
    },
    "Api": {
      "commandName": "Project",
      "dotnetRunMessages": "true",
      "launchBrowser": true,
      "launchUrl": "swagger",
      "applicationUrl": "https://localhost:5016;",
      "environmentVariables": {
        "ASPNETCORE_ENVIRONMENT": "Development"
      }
    }
  }
}
I suggest to use ASP.NET Core HTTPS development certificate to develop locally under HTTPS. If you need help to make it work read this post: ASP.NET Core HTTPS development certificate on Windows.
Run the API project. Now, you should be able to see https://localhost:5016/swagger/index.html.
API project contains a WeatherForecastController by default, which is enough for the context of this post.
Add Protection the API using IdntityServer
To apply protection the to the API, add JWT bearer authentication handler. The Audience is the API’s unique ID and it will be used for API configurations on IdentityServer.
public class Startup
{
    public void ConfigureServices(IServiceCollection services)
    {
        ...

        services.AddAuthentication("Bearer").AddJwtBearer("Bearer",
            options =>
            {
                options.Authority = "https://localhost:5001";
                options.Audience = "weatherapi";
            });
        ...
    }

    public void Configure(IApplicationBuilder app, IWebHostEnvironment env)
    {
        ...

        app.UseAuthentication();

        app.UseAuthorization();

        ...
    }
}
Note that UseAuthentication should come before UseAuthorization while configuring the API (see above sample code).
Add protection to an endpoint on API
To add protection to an endpoint inside API project, add [Authorize] attribute. If you need authorization on all endpoints, add the [Authorize] attribute on the controller class.
[ApiController]
[Route("weatherforecasts")]
public class WeatherForecastController : ControllerBase
{
    ...

    [HttpGet, Authorize]
    public IEnumerable<WeatherForecast> Get()
    {
        ...
    }
    ...
}
As result, to access weatherforecasts endpoint, we need to pass an access_token as Bearer on Authorization header when calling it.
The access token should be:
- Issued by IdentityServer hosted on
https://localhost:5001. - Contains a value as
weatherapionaudproperty.
Here is an example:
{
  "nbf": 1614400591,
  "exp": 1614404191,
  "iss": "https://localhost:5001",
  "aud": [
    "weatherapi",
    "https://localhost:5001/resources"
  ],
  "client_id": "wasmappauth-client",
  "sub": "818727",
  "auth_time": 1614400583,
  "idp": "local",
  "jti": "A63C943BF63692E1923A37A44F42BDA4",
  "sid": "97BA5DCBFAA1E3E464E32B0A80167179",
  "iat": 1614400591,
  "scope": [
    "openid",
    "profile"
  ],
  "amr": [
    "pwd"
  ]
}
Enable Cross-Origin Requests (CORS) on the API
The Blazor WASM standalone app is a single page app (SPA) running on browser. To make requests from the browser to an endpoint with a different origin, the endpoint must enable cross-origin resource sharing (CORS). This step is to enable Cross-Origin Requests (CORS) on the API. Read more here
public class Startup
{
    public void ConfigureServices(IServiceCollection services)
    {
        ...

        services.AddCors(options =>
        {
            options.AddPolicy("default", policy =>
            {
                policy.WithOrigins("https://localhost:5015") //The Blazor WASM app's URL.
                    .AllowAnyHeader()
                    .AllowAnyMethod();
            });
        });
        ...
    }

    public void Configure(IApplicationBuilder app, IWebHostEnvironment env)
    {
        ...

        app.UseCors("default");

        ...
    }
}
Add policy-based protection to an endpoint on API
Policy based authorization is the next level of protection for an API endpoint. Follow these steps:
-
Add the policy on API configuration. Here is an example of a policy which requires a specific scope on the access_token.
public class Startup { ... public void ConfigureServices(IServiceCollection services) { ... services.AddAuthorization(options => { options.AddPolicy("read-access", policy => { policy.RequireAuthenticatedUser(); policy.RequireClaim("scope", "weather.read"); }); }); } } -
Change the endpoint to add policy on
[Authorize]attribute:[ApiController] [Route("weatherforecasts")] public class WeatherForecastController : ControllerBase { ... [HttpGet, Authorize("read-access")] public IEnumerable<WeatherForecast> Get() { ... } ... }
The weatherforecasts endpoint requires a Bearer access_token that is:
-
Issued by IdentityServer hosted on
https://localhost:5001 -
Contains a value as
weatherapionaudproperty -
Contains a scope as
weather.read. Here is an example:{ "nbf": 1614400591, "exp": 1614404191, "iss": "https://localhost:5001", "aud": [ "weatherapi", "https://localhost:5001/resources" ], "client_id": "wasmappauth-client", "sub": "818727", "auth_time": 1614400583, "idp": "local", "jti": "A63C943BF63692E1923A37A44F42BDA4", "sid": "97BA5DCBFAA1E3E464E32B0A80167179", "iat": 1614400591, "scope": [ "openid", "profile", "weather.read" ], "amr": [ "pwd" ] }
Verify the API
To verify non-protected endpoints, use swagger. I’ve added a verify endpoint to verify if the API is up and running.
[ApiController]
[Route("weatherforecasts")]
public class WeatherForecastController : ControllerBase
{
    ...

    [HttpGet]
    [Route("verify")]
    public string Verify()
    {
        return "API is up!";
    }
    ...
}
Run the API project, execute /weatherforecasts/verify on https://localhost:5016/swagger/index.html. It should return API is up!.
To call and verify a protected endpoint such as /weatherforecasts you need a REST client like postman to specify authorization.
In our case, we will verify the protected endpoint API call by using Blazor WASM standalone client app later. So, leave this here for now.
IdentityServer
There are couple of changes required on IdentityServer:
-
Add API resources and scopes for weather API. The API resource value should match API’s audience used on API setup. The API scopes are stands for access types you want to expose for the API. For now, I only have a simple read scope:
public static class Config { ... public static IEnumerable<ApiScope> ApiScopes => new ApiScope[] { new ApiScope("weather.read") }; public static IEnumerable<ApiResource> ApiResources => new ApiResource[] { new ApiResource("weatherapi", "Weather API") //API's Audience { Scopes = { "weather.read" } } }; ... } -
Add the API resources and scopes to the IdentityServer. In my example, I use in-memory configurations. It only requires adding
AddInMemoryApiResourcesandAddInMemoryApiScopesto IdentityServer instance.public class Startup { ... public void ConfigureServices(IServiceCollection services) { ... var builder = services.AddIdentityServer(options => { // see https://identityserver4.readthedocs.io/en/latest/topics/resources.html options.EmitStaticAudienceClaim = true; }) .AddInMemoryIdentityResources(Config.IdentityResources) .AddInMemoryApiResources(Config.ApiResources) .AddInMemoryApiScopes(Config.ApiScopes) .AddInMemoryClients(Config.Clients) .AddTestUsers(TestUsers.Users); ... } ... } -
Change the Blazor WASM app config and add the API scope to list of allowed scopes. If client ask for this scope when requesting token, this scope will be added to the issued token by IdentityServer. If the issued token contains at least one of the weather API’s scopes, it will also have the weather API’s audience.
public static class Config
{
    public static IEnumerable<Client> Clients =>
        new Client[]
        {
            new Client
            {
                ClientId = "wasmappauth-client",
                ...

                AllowedScopes = {"openid", "profile", "offline_access", "weather.read" },
                ...
            }
        };
}
The Blazor WASM standalone app:
To call a protected endpoint, access_token should be passed as Bearer on Authorization header. There are multiple ways to call an API endpoint from Blazor WASM app. Using typed HTTPClient along with AuthorizationMessageHandler is one of suggested options which encapsulates the authorization header logic.
Add the custom AuthorizationMessageHandler on Blazor WASM standalone app:
- Add a class which implements
AuthorizationMessageHandler. - Configure the handler:
authorizedUrls: Add the API url to this list.scopes: Add required scopes by API endpoint to this list. In our case it isweather.read. If the default access_token issued by IdentityServer doesn’t contain these scopes, the handler calls the IdentityServer’stokenendpoint and requests for a new token.
public class CustomAuthorizationMessageHandler : AuthorizationMessageHandler
{
    public CustomAuthorizationMessageHandler(IAccessTokenProvider provider,
        NavigationManager navigationManager)
        : base(provider, navigationManager)
    {
        ConfigureHandler(
            authorizedUrls: new[] { "https://localhost:5016" },
            scopes: new[] { "weather.read" });
    }
}
Add the typed HttpClient on Blazor WASM standalone app:
- Add a new class which accepts
HttpClientas constructor param. - Add a method to call each endpoint using the injected
HttpClient. - Add error handling of your need and choice.
public class WeatherForecastHttpClient
{
    public HttpClient _httpClient;

    public WeatherForecastHttpClient(HttpClient client)
    {
        _httpClient = client;
    }

    public async Task<List<WeatherForecast>> GetWeatherForecastsAsync()
    {
        var response = await _httpClient.GetAsync("/weatherforecasts");
        response.EnsureSuccessStatusCode();

        return await response.Content.ReadFromJsonAsync<List<WeatherForecast>>();
    }
}
Register new added types on Blazor WASM standalone app
- Register
CustomAuthorizationMessageHandlerusingAddScopedextension. - Register
WeatherForecastHttpClientusingAddHttpClientextension method. - Set
BaseAddressto the API’s base address when adding the typedHttpClient. - Set
CustomAuthorizationMessageHandleras a message handler forWeatherForecastHttpClientusingAddHttpMessageHandlerhelper method.
public class Program
{
    public static async Task Main(string[] args)
    {
        ...

        builder.Services.AddScoped<CustomAuthorizationMessageHandler>();
        builder.Services.AddHttpClient<WeatherForecastHttpClient>(client =>
        {
            client.BaseAddress = new Uri("https://localhost:5016");
        }).AddHttpMessageHandler<CustomAuthorizationMessageHandler>();

        ...
    }
}
Call the protected endpoint on Blazor WASM standalone app
- Modify
FetchDatarazor page to be protected by adding[Authorize]on the top of page. This is to ensure access_token is accessible on this page. - Add an instance of
WeatherForecastHttpClienton the top. - Call
GetWeatherForecastsAsyncmethod to fetch the data from API.
...

@page "/fetchdata"
@attribute [Authorize]

@inject WeatherForecastHttpClient Http

@using Microsoft.AspNetCore.Authorization;
@using WasmAppAuth.Services;

...

@code {
    private List<WeatherForecast> forecasts;

    protected override async Task OnInitializedAsync()
    {
        forecasts = await Service.GetWeatherForecastsAsync();
    }
}
Add to default scopes on Blazor WASM standalone app
You can add required scope for the API to the list of DefaultScopes. The DefaultScopes exists on the access_token issued on Login by IdentityServer. This is suggested if some of scopes are used on all API calls.
public class Program
{
    public static async Task Main(string[] args)
    {
        ...

        builder.Services.AddOidcAuthentication(options =>
        {
            ...

            options.ProviderOptions.DefaultScopes.Add("weather.read");
        });
    }
}
Verify the API call from Blazor WASM standalone app
Now its time to verify all changes we have made:
-
Change the solution to have multiple startup projects and run it. This is to run IdentityServer, API, and
WasmAppAuthall together. -
Use any of test users to login. (i.e. alice/alice)
-
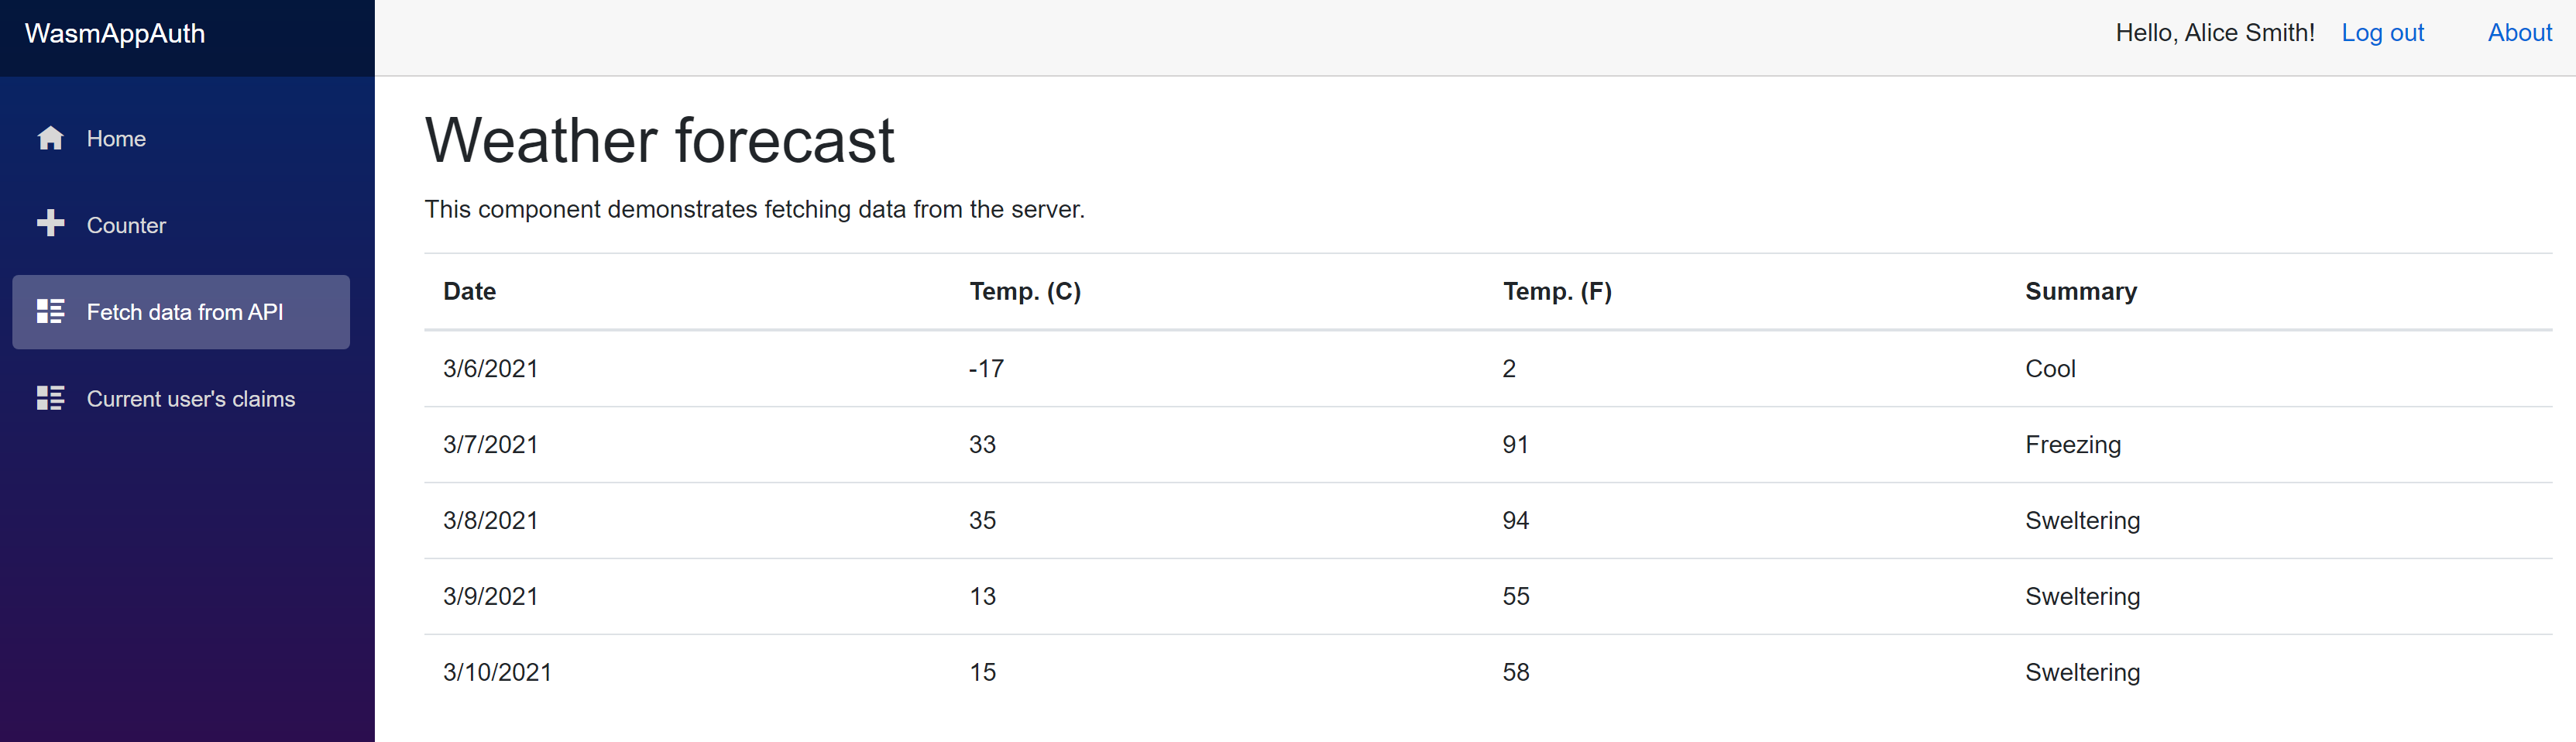
Try
Fetch Data from APIfrom left side menu. There should be weather data listed with no error.
Summary
By doing this, you can call a protected endpoint from Blazor WASM standalone app. However, there are many other ways to extend and implement more complex security scenarios.
Sample code
Find the sample code for this post on my Blazor Adventures repo.