Blazor WebAssembly standalone - Authentication and authorization with IdentityServer4
Introduction
I’ve never been very good at javascript, this eventually led me to be a backend developer. But now with ASP.NET Core Blazor we can build client web apps with C#. And I again see an opportunity for myself to make some nice UI. I decided to write some blog series about my adventures with Blazor. Starting with what I know the best which is web apps security. In these series I want to talk about securing an ASP.NET Core Blazor standalone app.
Here is the topics I intend to cover in this series:
- Blazor WebAssembly standalone - Authentication and Authorization with IdentityServer4
- Blazor WebAssembly standalone - Calling a protected API using access token
- Blazor WebAssembly standalone - Role-based and Policy-based authorization
On this post I will discuss about implementing authentication on a Blazor WebAssembly standalone app via OpenID Connect(OIDC) using IdentityServer4(IDS4). And also authorization on Blazor WebAssembly standalone app. IDS4 is a certified OpenId provider library.
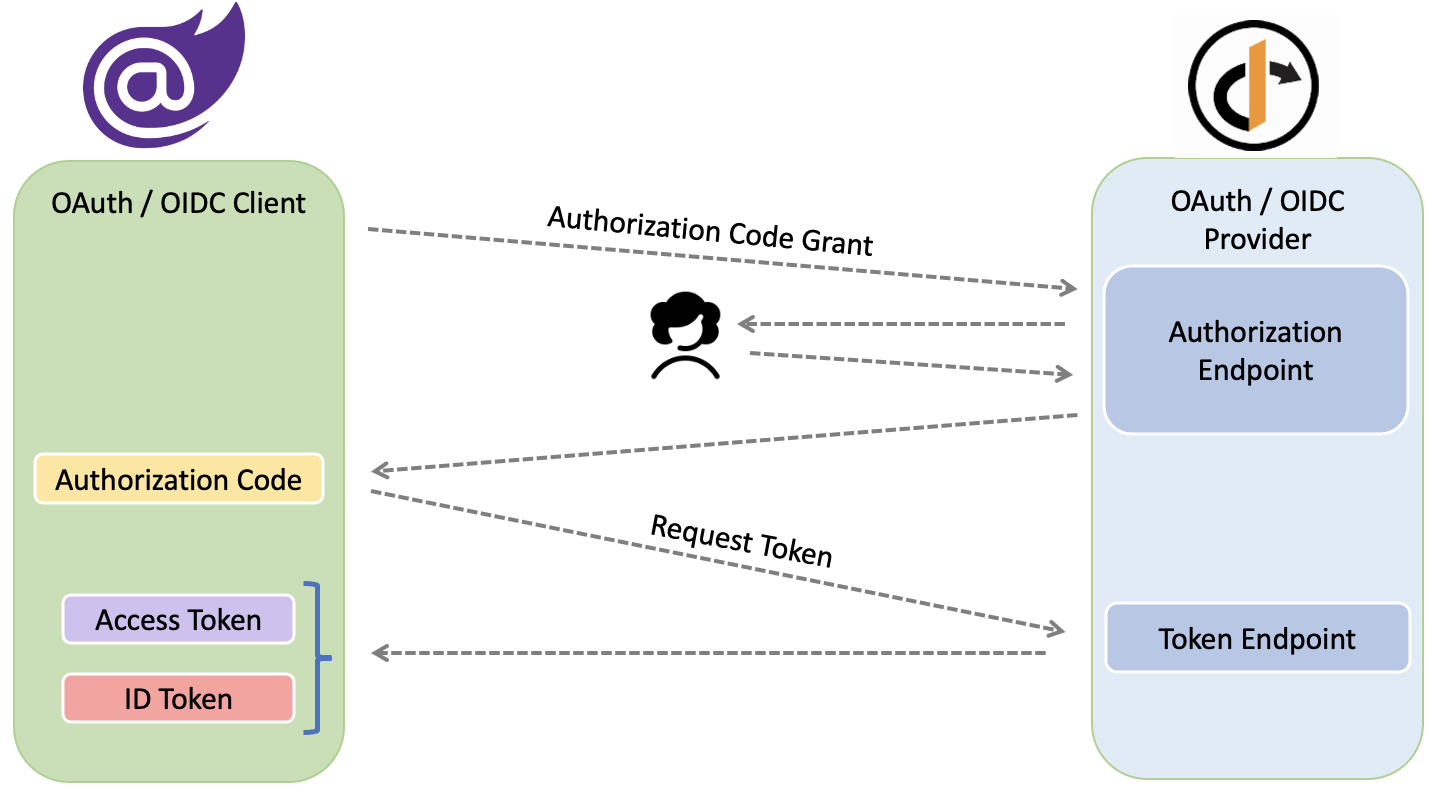
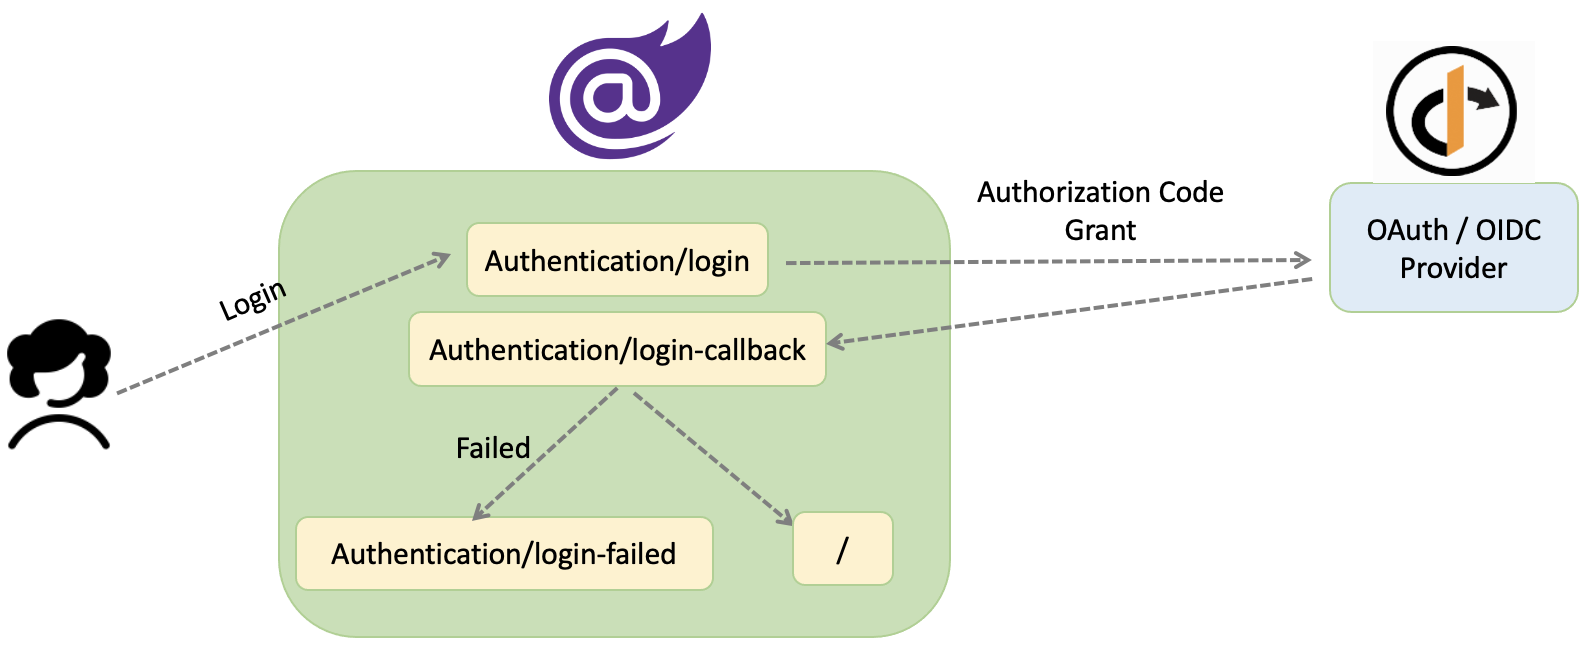
For authentication I am using Authorization Code flow on OpenID Connect. Bellow diagram is to show the code grant’s big picture:
If you are new to ASP.NET Core Blazor WebAssembly, please see here before reading this post.
And for those who never heard of IdentityServer4, it’s is an OpenID Connect and OAuth 2.0 framework for ASP.NET Core. Described in it’s official doc:
IdentityServer is middleware that adds the spec compliant OpenID Connect and OAuth 2.0 endpoints to an arbitrary ASP.NET Core application.
I suggest to read more about IdentityServer4 to have a better understanding of what we are trying to do here.
For this purpose I will setup an IdentityServer instance and a Blazor WebAssembly standalone app. I have intentionally chosen IdentityServer with InMemory setup and a Blazor WebAssembly app with no server call to focus on main objective.
After setup the solution structure will be like this:
- BlazorSecurity.sln
  - IdentityServer.csproj
  - WasmAppAuth.csproj
Sample code
Find the sample code for this post on my Blazor Adventures repo.
Prerequisites
At the time of writing this blog, latest .NET SDK contains all we need to build and run Blazor apps.
Versions
I’m using IdentityServer4 4.1.1 on sample code. If you are using older versions such as IdentityServer4 3.1 please see my post on Migrating IdentityServer4 to v4.
Setup IdentityServer
To setup the IdentityServer4 project, you can follow instruction on IDS4 docs or the instructions bellow which is based on same docs. Open the power-shell and run the following commands:
# Install the templates
dotnet new -i IdentityServer4.Templates

md BlazorSecurity
cd BlazorSecurity

md src
cd src

# Create an empty solution
dotnet new sln -n BlazorSecurity

# Create an empty IDS4  project
dotnet new is4empty -n IdentityServer

cd IdentityServer

# Add UI to IdentityServer
dotnet new is4ui

cd..

# Add the project to the solution
dotnet sln add IdentityServer\IdentityServer.csproj
We have an instance of IdentityServer with UI. Here is the the solution structure so-far:
- BlazorSecurity.sln
  - IdentityServer.csproj
We need to change the code to make it ready for our purpose. I use stepwise approach to avoid potential mistakes.
-
Open
BlazorSecurity.slnusing visualStudio. We should haveIdentityServerproject listed on Solution Explorer. -
On IdentityServer project, open
launchSettings.jsonlocated underPropertiesfolder and change it to add HTTPS for application urls.
{
  "iisSettings": {
    "windowsAuthentication": false,
    "anonymousAuthentication": true,
    "iisExpress": {
      "applicationUrl": "http://localhost:5000",
      "sslPort": 5001
    }
  },
  "profiles": {
    "IIS Express": {
      "commandName": "IISExpress",
      "launchBrowser": true,
      "environmentVariables": {
        "ASPNETCORE_ENVIRONMENT": "Development"
      }
    },
    "SelfHost": {
      "commandName": "Project",
      "launchBrowser": true,
      "environmentVariables": {
        "ASPNETCORE_ENVIRONMENT": "Development"
      },
      "applicationUrl": "https://localhost:5001"
    }
  }
}
We need HTTPS as SameSite=None is a must to allow cross-site cookie use. Cookies that assert SameSite=None must also be marked as Secure. Read more here. The default value for CookieSameSiteMode is None on IdentityServer4.
To develop locally under HTTPS we can use ASP.NET Core HTTPS development certificate. If you need help to make it work read my post here.
- Run the IdentityServer project. Browse the discovery endpoint to make sure it’s up and running. In our case discovery endpoint would be on:
https://localhost:5001/.well-known/openid-configuration
As we made no change to default settings yet, on the result supported scopes and claims should be as bellow:
"scopes_supported": [
    "openid",
    "offline_access"
],
"claims_supported": [
  "sub"
],
- To activate the sample UI including login page, we need to un-comment suggested code for MVC on
Startup.cs. Earlier we added the sample UI by runningdotnet new is4uion IdentityServer project, we are now trying to activate it. To do so openStartUp.csclass and uncomment code marked with//uncomment if you want to add MVC. Here is howStartUp.cslooks like after these changes:
namespace IdentityServer
{
    public class Startup
    {
        public IWebHostEnvironment Environment { get; }

        public Startup(IWebHostEnvironment environment)
        {
            Environment = environment;
        }

        public void ConfigureServices(IServiceCollection services)
        {
            // uncomment, if you want to add an MVC-based UI
            services.AddControllersWithViews();

            var builder = services.AddIdentityServer(options =>
            {
                // see https://identityserver4.readthedocs.io/en/latest/topics/resources.html
                options.EmitStaticAudienceClaim = true;
            })
                .AddInMemoryIdentityResources(Config.IdentityResources)
                .AddInMemoryApiScopes(Config.ApiScopes)
                .AddInMemoryClients(Config.Clients);

            // not recommended for production - you need to store your key material somewhere secure
            builder.AddDeveloperSigningCredential();
        }

        public void Configure(IApplicationBuilder app)
        {
            if (Environment.IsDevelopment())
            {
                app.UseDeveloperExceptionPage();
            }

            // uncomment if you want to add MVC
            app.UseStaticFiles();
            app.UseRouting();

            app.UseIdentityServer();

            // uncomment, if you want to add MVC
            app.UseAuthorization();
            app.UseEndpoints(endpoints =>
            {
                endpoints.MapDefaultControllerRoute();
            });
        }
    }
}
- To enable in-memory test users to sample UI, Add the
AddTestUsersextension method when setting up the IdentityServer:
var builder = services.AddIdentityServer(options =>
            {
                // see https://identityserver4.readthedocs.io/en/latest/topics/resources.html
                options.EmitStaticAudienceClaim = true;
            })
                .AddInMemoryIdentityResources(Config.IdentityResources)
                .AddInMemoryApiScopes(Config.ApiScopes)
                .AddInMemoryClients(Config.Clients)
                .AddTestUsers(TestUsers.Users);;
TestUsers are on IdentityServerHost.Quickstart.UI namespace. These test users contains some profile data(first name, last name etc..) and can be shown on Blazor WebAssembly UI late on.
-
Run the IdentityServer project. We can login on
https://localhost:5001/Account/Loginusing one of development creds such asalice/aliceor ay other user listed onTestUsers.Users. If we browsehttps://localhost:5001/diagnosticsafter login, we should see user’s info(alice). -
To login using OpenID Connect, it is mandatory to add required scope for OpenID Connect.
profileidentity resource is also required to access profile claims. Change theIdentityResourcesonConfig.csclass:
public static IEnumerable<IdentityResource> IdentityResources =>
    new List<IdentityResource>
    {
        new IdentityResources.OpenId(), //standard openid (subject id)
        new IdentityResources.Profile(), //(first name, last name etc..)
    };
After this change, discovery endpoint(/.well-known/openid-configuration) result should look like this:
"scopes_supported": [
    "openid",
    "profile",
    "offline_access"
],
"claims_supported": [
  "sub",
  "name",
  "family_name",
  "given_name",
  "middle_name",
  "nickname",
  "preferred_username",
  "profile",
  "picture",
  "website",
  "gender",
  "birthdate",
  "zoneinfo",
  "locale",
  "updated_at"
],
As a side note I should say that identity resource is a named group of claims that can be requested using the scope parameter. Read more here
- Now add client’s config for WebAssembly Blazor standalone app. A very common practice is to add metadata before adding the client itself. We will setup the Blazor WebAssembly app to reflect these value later on.
Open Config.cs class and add client configuration for the Blazor WebAssembly standalone app as follow:
public static IEnumerable<Client> Clients =>
    new Client[]
    {
        new Client
        {
            ClientId = "wasmappauth-client",
            ClientName = "Blazor WebAssembly App Client",
            RequireClientSecret = false,

            AllowedGrantTypes = GrantTypes.Code,
            RequirePkce = true,

            AllowedCorsOrigins = { "https://localhost:5015" },
            RedirectUris = { "https://localhost:5015/authentication/login-callback" },
            PostLogoutRedirectUris = { "https://localhost:5015/authentication/logout-callback" },

            AllowedScopes = {"openid", "profile"},
        }
    };
Here is some notes about each of the values set above:
-
ClientId: It’s the unique identifier for the client. -
RequireClientSecret: As the client is a browser based app, we consider it a public client and set this to false. Ref. Default value forRequireClientSecretis true. -
AllowedGrantTypes: Set tocodeas our client is an interactive client. -
RequirePkce: Set totrueto enable rfc7636. In simple word this Proof Key for Code Exchange (PKCE) introduces a per-request secret for code flow and helps to protect against code substitution attack. -
AllowedCorsOrigins: The client is a browser based app. To make it possible to call IdentityServer from client we need to add Blazor WebAssembly URL here. This will be used by the default CORS policy service implementations. -
RedirectUris: This is the url to redirect back after a successful login to return tokens or authorization codes. Default value for Blazor WebAssembly apps is{Blazor WebAssembly app URL}/authentication/login-callback. -
PostLogoutRedirectUris: This is the url to redirect back after a logout. Default value for Blazor WebAssembly apps is{Blazor WebAssembly app URL}//authentication/logout-callback -
AllowedScopes: These lists scope names to access allowed resources. As mentioned before onIdentityResources, OpenId Connect requiresopenidscope, andprofilescope is needed to access user’s profile info(first name, last name etc..).
Please read more about each and every one of these parameters [here](Ref.
- Run the IdentityServer project. We can login on
https://localhost:5001/Account/Loginusing one of development creds such asalice/aliceor ay other user listed onTestUsers.Users. Browsinghttps://localhost:5001/diagnosticsafter login, should show user’s info(alice).
Create Blazor WebAssembly standalone app with authentication
Next step is to create the the Blazor WebAssembly standalone app with authentication. Add the app using Blazor WebAssembly template available on .NET Core CLI or via Visual Studio.
For Blazor WebAssembly template open the power-shell and run following commands:
cd BlazorSecurity
cd src

# Create
dotnet new blazorwasm --auth Individual -o WasmAppAuth

# Add the project to the solution
dotnet sln add WasmAppAuth\WasmAppAuth.csproj
Or you can use the Visual Studio wasm project template, and change the Authentication to Individual User Accounts:
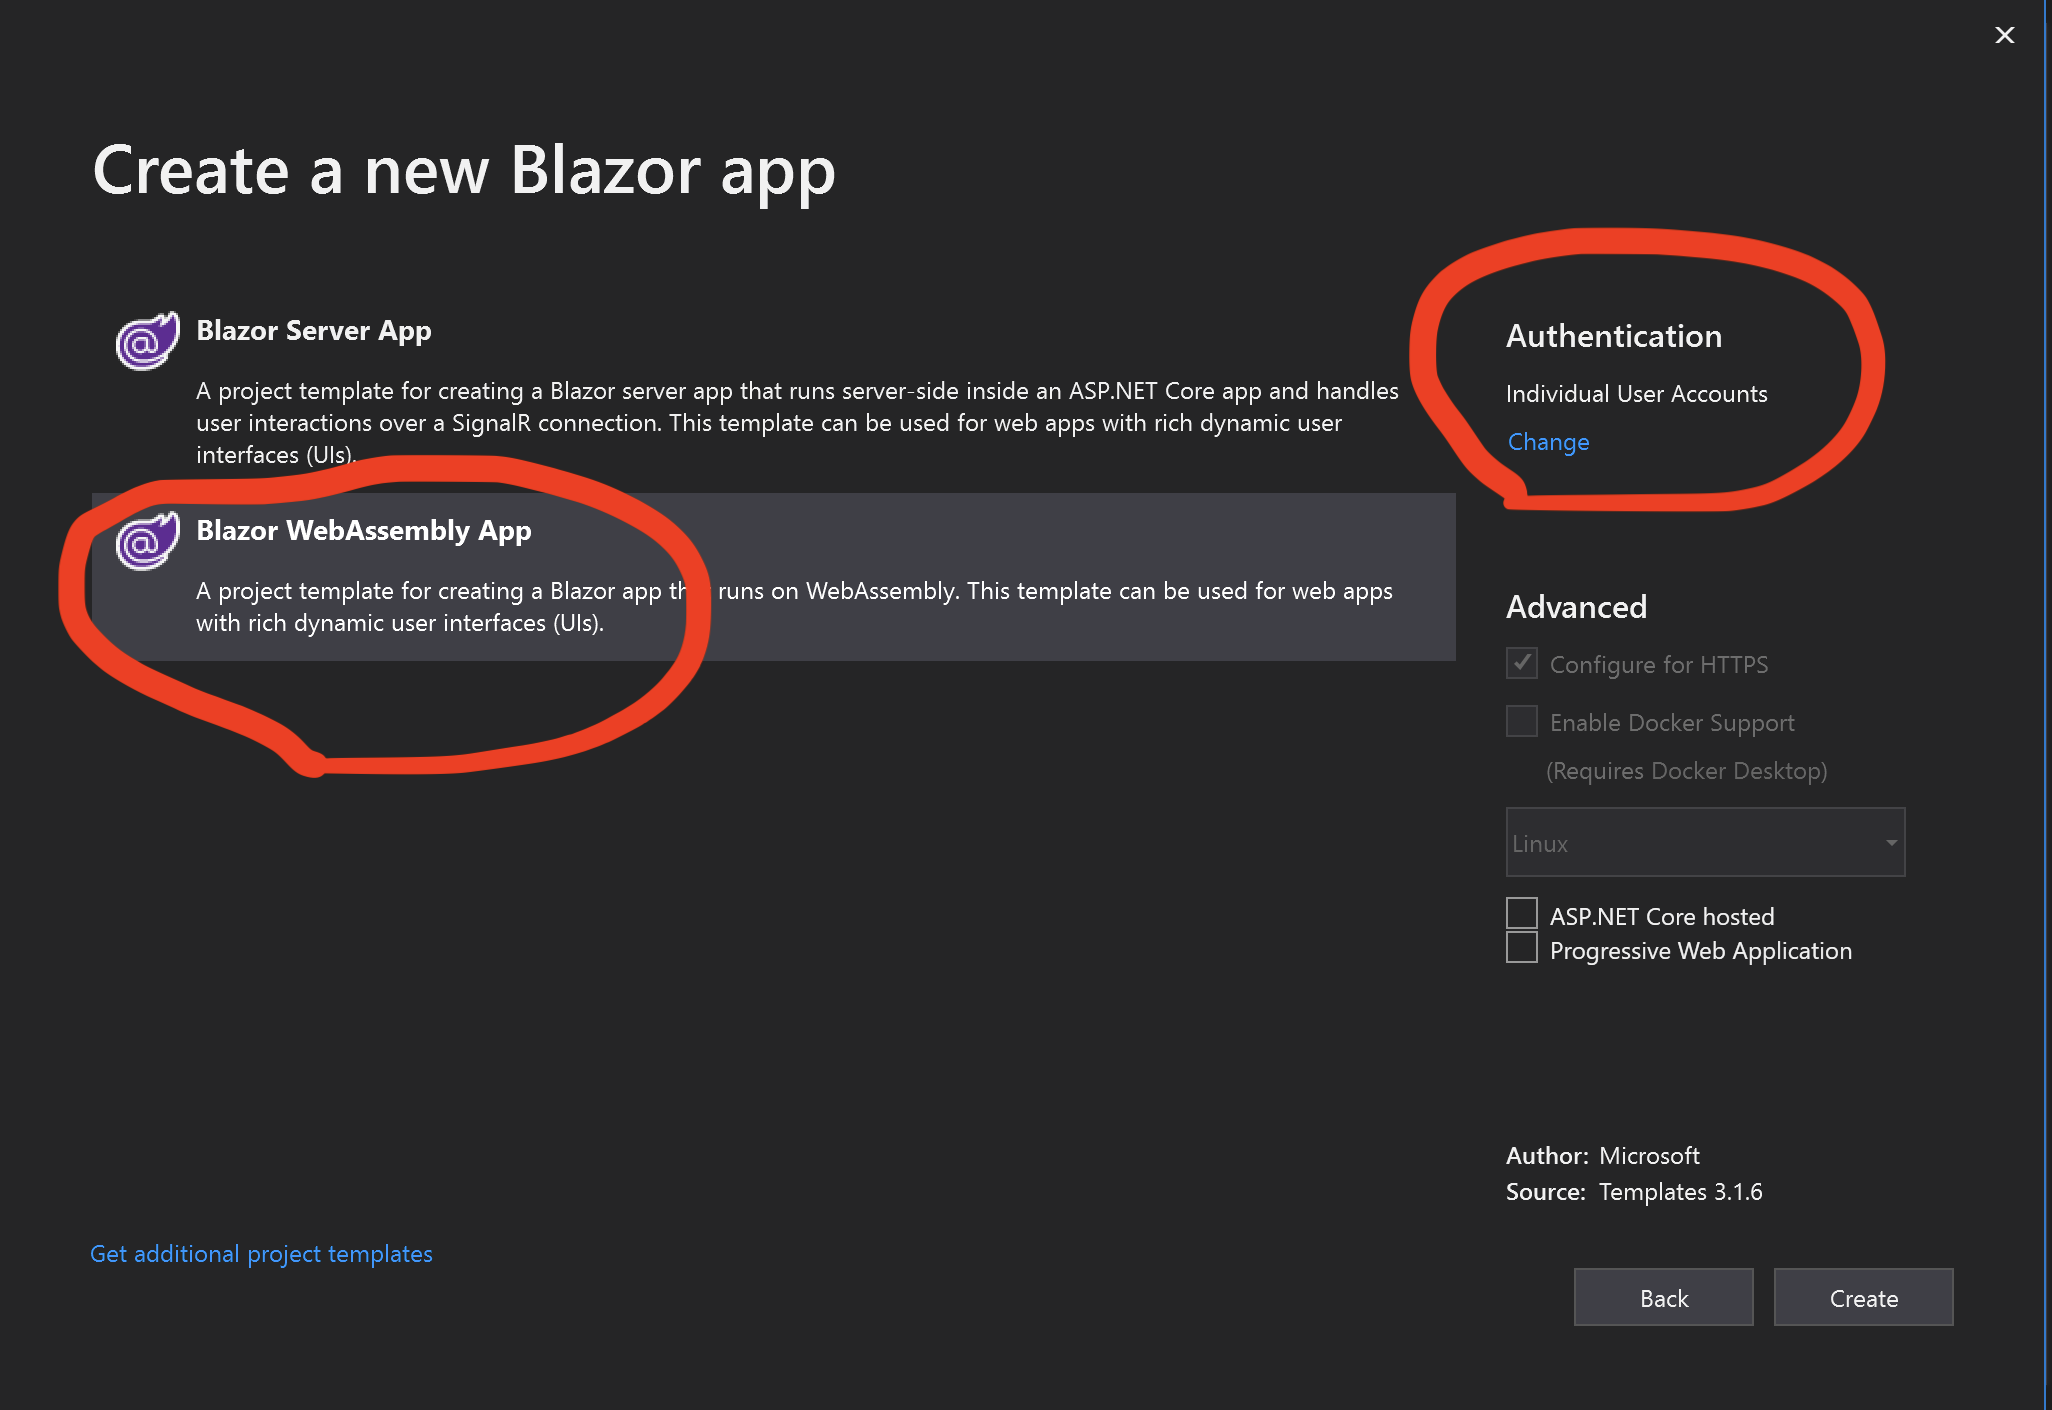
Read more about Blazor WebAssembly app with authentication template, see here.
The solution structure should be like this as of now:
- BlazorSecurity.sln
  - IdentityServer.csproj
  - WasmAppAuth.csproj
Before going to next part, make sure the application is up and running.
Open launchSettings.json to change the values to what you have set on IdentityServer. Based on this post’s sample code launchSettings.json should appear like:
{
  "iisSettings": {
    "windowsAuthentication": false,
    "anonymousAuthentication": true,
    "iisExpress": {
      "applicationUrl": "http://localhost:5005",
      "sslPort": 5015
    }
  },
  "profiles": {
    "IIS Express": {
      "commandName": "IISExpress",
      "launchBrowser": true,
      "environmentVariables": {
        "ASPNETCORE_ENVIRONMENT": "Development"
      }
    },
    "WasmAppAuth": {
      "commandName": "Project",
      "launchBrowser": true,
      "environmentVariables": {
        "ASPNETCORE_ENVIRONMENT": "Development"
      },
      "applicationUrl": "https://localhost:5015"
    }
  }
}
Now we have an empty Blazor WebAssembly standalone app with required authentication libraries setup. All we need to do is to connect it to the IdentityServer and verify the login and logout.
Open Program.cs to set authority info
builder.Services.AddOidcAuthentication(options =>
   {
       // Configure you’re authentication provider options here.
       // For more information, see https://aka.ms/blazor-standalone-auth
       options.ProviderOptions.Authority = "https://localhost:5001"; //The IdentityServer URL
       options.ProviderOptions.ClientId = "wasmappauth-client"; // The client ID
       options.ProviderOptions.ResponseType = "code";
   });
You dont need to change the options.ProviderOptions.DefaultScopes as the default scopes are already openid and profile.
Select multiple startup project to run IdentityServer and Blazor app simultaneously.
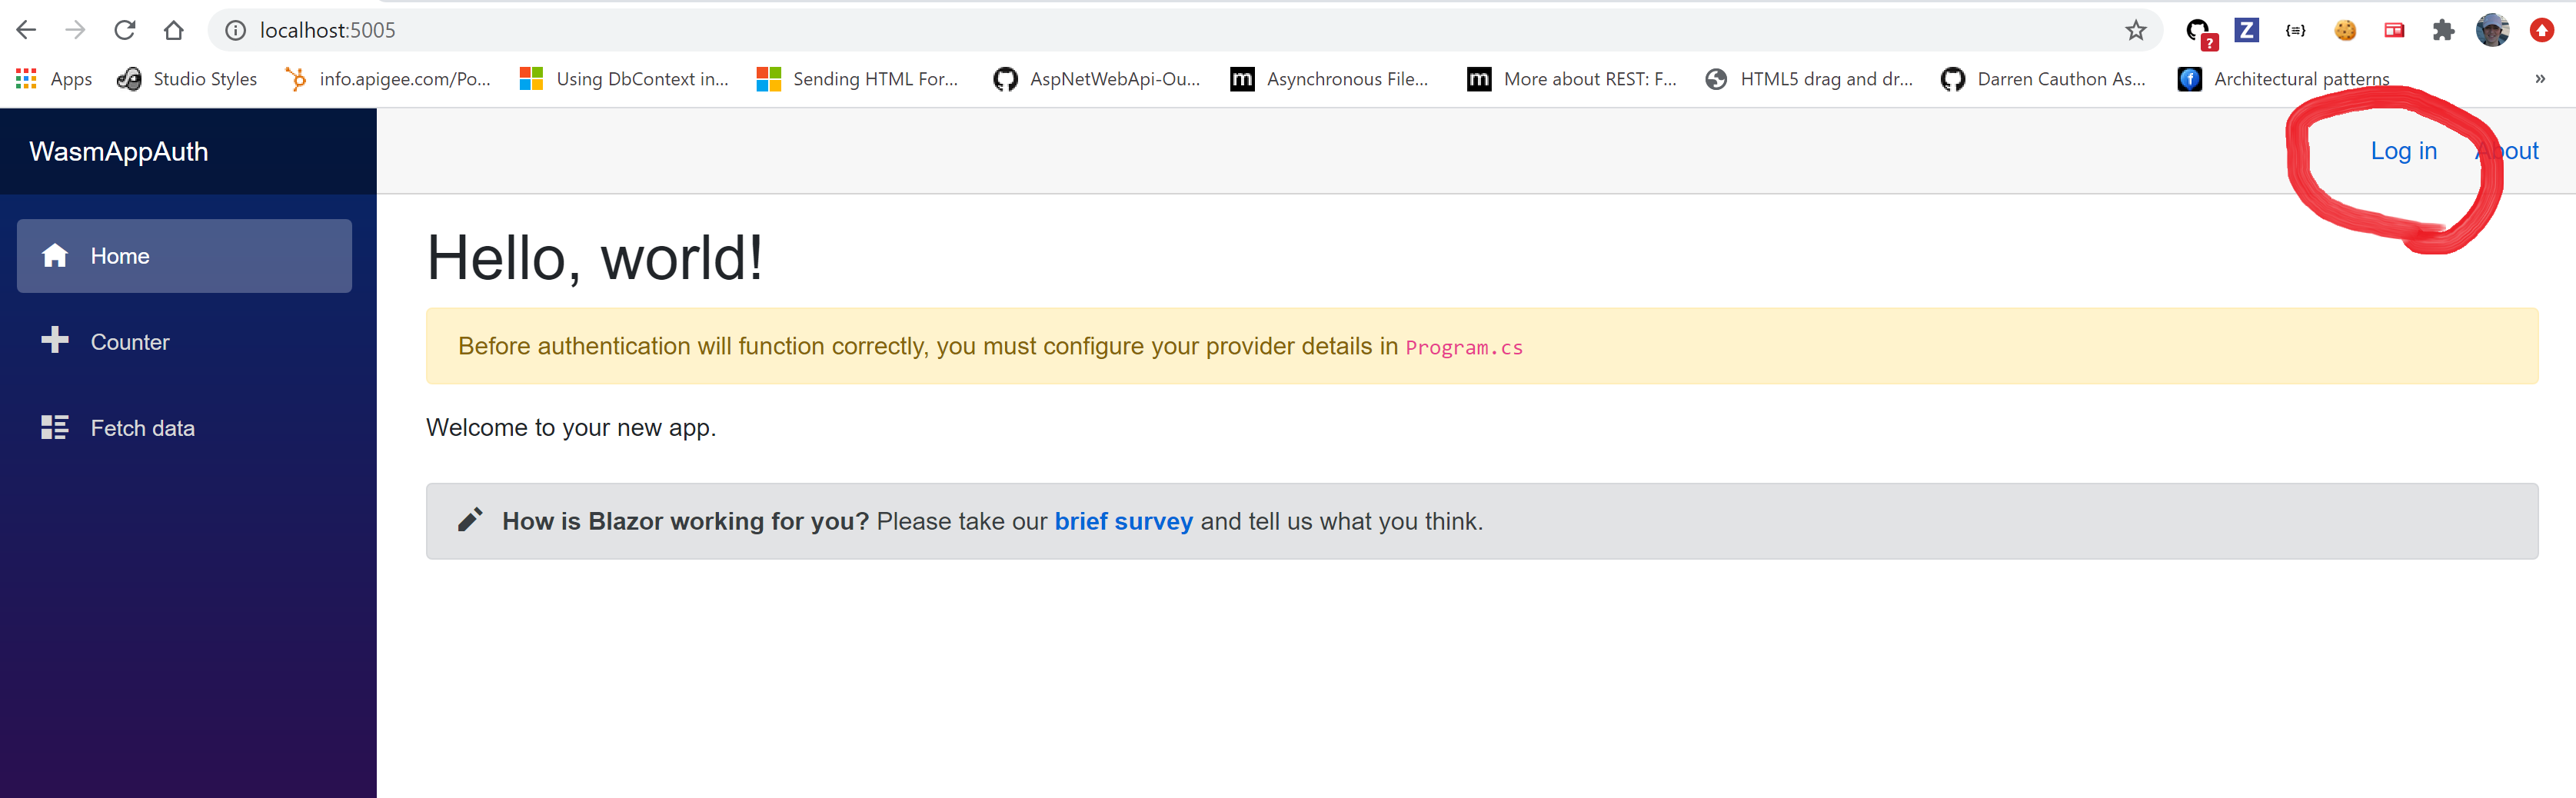
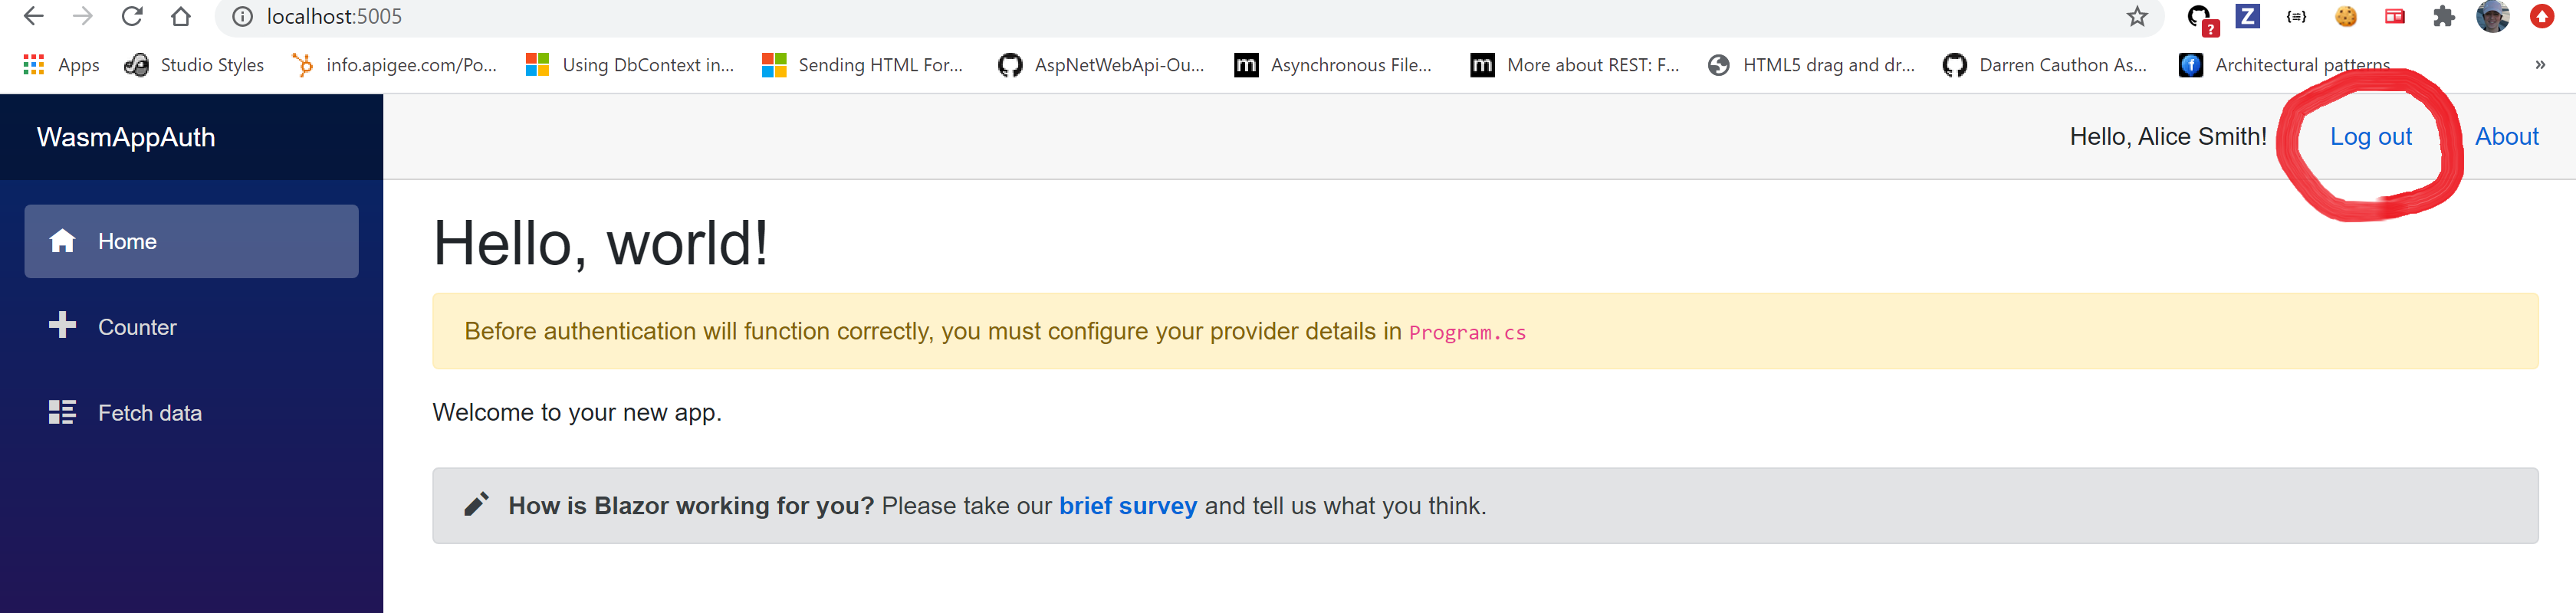
Login via link on header. Choose any of test users listed on TestUsers.Users.
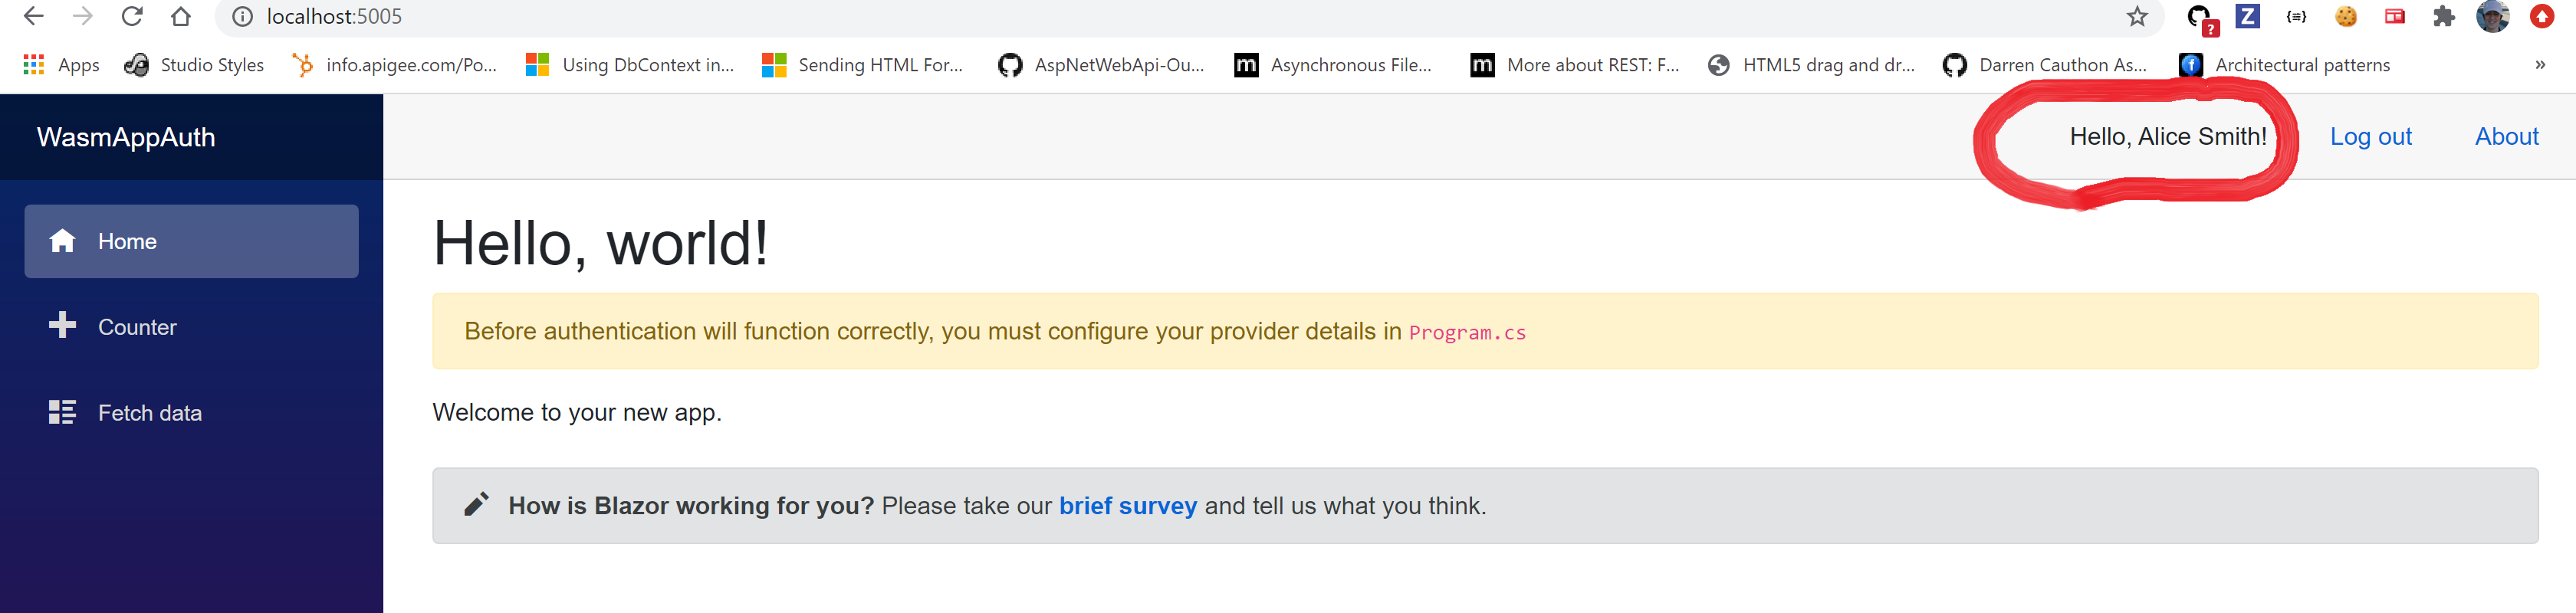
I used alice/alice to login, after success full login, I can see user’s name on header. This is added to header on LoginDisplay.razor by including @context.User.Identity.Name. Its value comes from JwtClaimTypes.Name claim on the user, which in my case is "Alice Smith".
Logout using the link on header.
We can set automatic redirect after logout with no confirmation by setting AutomaticRedirectAfterSignOut = true on IdentityServerHost.Quickstart.UI.AccountOptions.
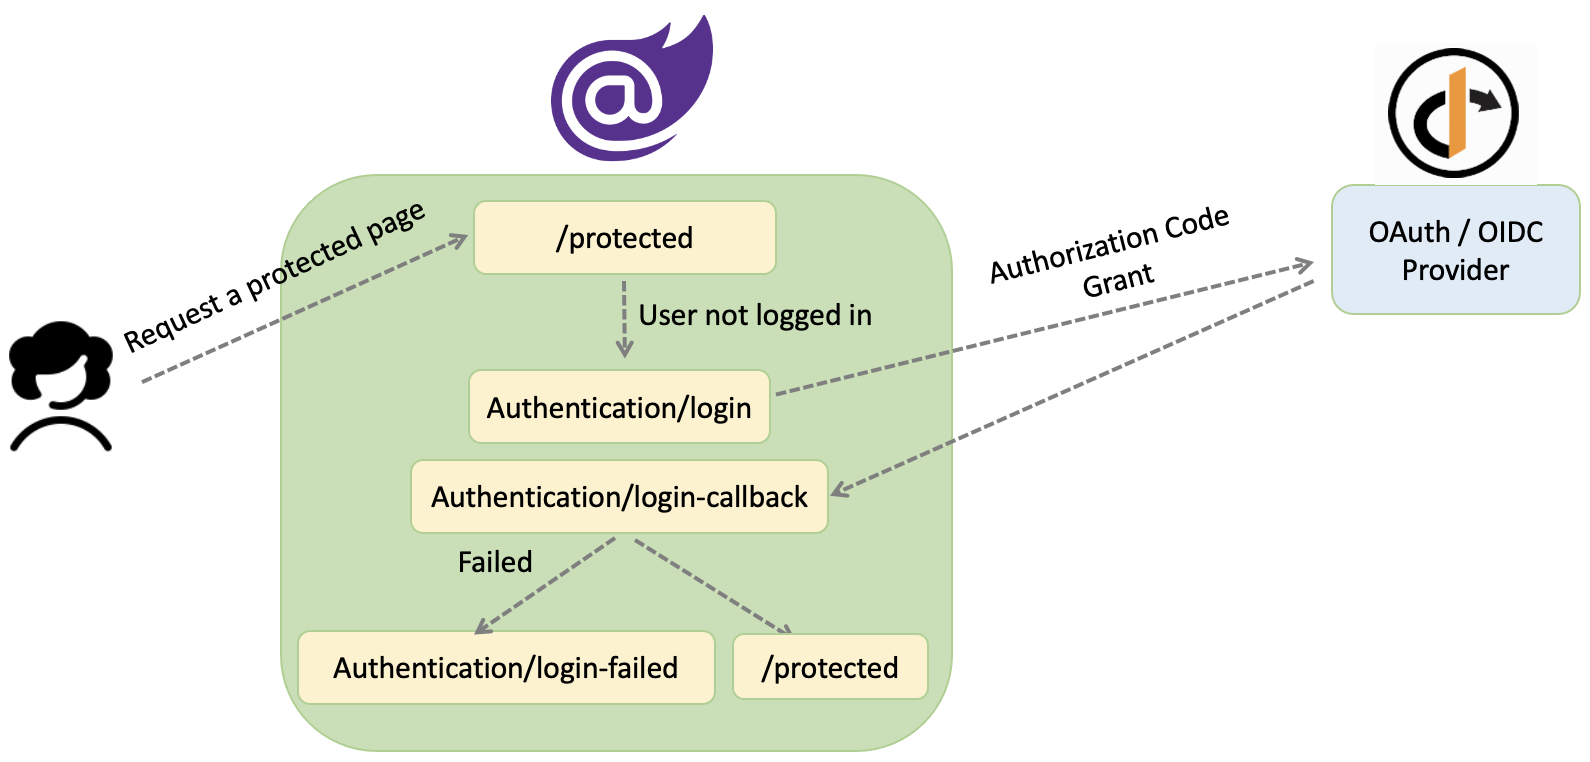
Diagrams bellow are to demonstrate the Blazor WASM app’s behaviour on login and when user tries to access a protected resource:
Authorization on Blazor WebAssembly app
Before we talk about authorization on Blazor WebAssembly app, let’s refresh on basics:
Blazor WebAssembly is a single-page app framework for building interactive client-side web apps with .NET. Blazor WebAssembly uses open web standards without plugins or code transpilation and works in all modern web browsers, including mobile browsers.
Blazor WebAssembly apps run on the browser(client). Since client-side code can be modified by a user, Blazor WebAssembly app can’t enforce authorization access rules. Authorization is only used to determine what to show on UI.
There are multiple options to apply authorization. Here is two of common ones:
[Authorize] attribute:
We can add [Authorize] attribute on a component to make it protected. Although we should only use [Authorize] on @page components reached via the Blazor Router.
In my example I made the Counter.razor component protected by changing the code to add @attribute [Authorize] and the required namespace @using Microsoft.AspNetCore.Authorization;.
@page "/counter"
@using Microsoft.AspNetCore.Authorization;
@attribute [Authorize]

<h1>Counter</h1>

<p>Current count: @currentCount</p>

<button class="btn btn-primary" @onclick="IncrementCount">Click me</button>

@code {
    private int currentCount = 0;

    private void IncrementCount()
    {
        currentCount++;
    }
}
After this change, only logged in users can access /counter route. Otherwise they will be redirected to IdentityServer for login.
The [Authorize] attribute also supports role-based or policy-based authorization. Read more here.
AuthorizeView:
The AuthorizeView component helps to selectively displays UI depending on whether the user is authorized or not. It also has a variable as context of type AuthenticationState, which contains information about the signed-in user.
A good example for AuthorizeView is LoginDisplay.razor. It displays current user’s name if Authorized or link for login if NotAuthorized.
<AuthorizeView>
    <Authorized>
        Hello, @context.User.Identity.Name!
        <button class="nav-link btn btn-link" @onclick="BeginSignOut">Log out</button>
    </Authorized>
    <NotAuthorized>
        <a href="authentication/login">Log in</a>
    </NotAuthorized>
</AuthorizeView>
Role-based and Policy-based authorization is supported on AuthorizeView. Find more information about it on Blazor WebAssembly standalone - Role-based and Policy-based authorization.
Summary
My goal was to show authentication and authorization on a Blazor WebAssembly using IdentityServer4 and I believe this is a good place to start. I am planning to write about Blazor WebAssembly standalone - Call an API using access token in the next post.
Sample code
Find the sample code for this post on my Blazor Adventures repo.
Updates
- Jul 27 2020 - First version.
- Nov 08 2020 - Change to add HTTPS.
- Nov 16 2020 - Upgrade to .NET 5.